
Many of us take for granted the beautiful
free fall work of the drop zone photographer. How did 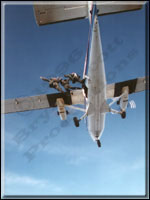
it all begin? Like all developing arts, it started out
a little rough around the edges. This is also true for CReW photography.
There are already a handful of developing photographers around the world
all striving for perfection in what is considered new territory. Here are
a few simple guidelines to help illuminate the path.
Things to consider in photographing CReW. What the organizers are looking for. What can you expect to happen and where can you fly to stay out of harm's way. How to fly your canopy in a wide range of flight modes and conditions to perform CReW photography.
What CReW organizers are looking for. Organizers look for video that can represent the jump from the base pin to break off. They want to see the base pin openings and actual base pin. Organizers will wish to see all of the approaches (bottom one-fourth to one-third screen) and they will want to see the break off. Sometimes they may want the altitude to be called out for reference. They will also want to see the break off to see if it was a clean one. This may seem like a simple task at first, but combine this with keeping a horizontal reference behind the formation (to show heading changes) and you're doing a very specialized type of Canopy Relative Work yourself.
What to expect during a CReW dive?
Aircraft Exits: If you are the only photographer on the load, it's probable you'll be exiting in the rear float position. You will need a clear, unencumbered view of the count on exit. Insist on it! There is nothing more terrifying than exiting with the base pin right on top of you, with pilot chute in hand. Make sure to have good eye-to-eye contact with the person giving the count. You will leave first, early on the count. Exit on "Ready" or "set". Deploy your pilot chute when clear of the plane (one to two seconds max.). Deploying too soon may catch the tail, deploying too late may put you in the vicinity of the base pin. Your hands should immediately be reaching for where your rear risers will be, executing a heading change if necessary. It's not uncommon for an off-heading opening or a close encounter. At any rate, be prepared for a quick rear risers turn. Next without looking, un-stow your brakes and keep the camera on the base pin. Begin closing the distance between you and the base pin. Failure to do so now, may put you too far behind for the rest of the dive. If you have a split slider, reach overhead and sort this out. Keep the camera on the formation.
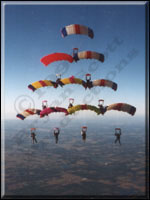
The Pursuit: If you're higher than the base, you'll have the advantage. You can close the distance between you rather quickly with a little front riser. If you're lower than the base, keep on heading with them. As it builds, it will sink and you'll have no problem closing any gap. At this point, consider the framing and try to provide some approach area in the picture. Fly your canopy, keeping the horizon at the center of the formation and pick a point on the horizon and try to keep that stationary. This may seem impossible, but it's not. Many cameramen use some kind of front riser assist (front riser trim tabs or a long front riser cross connector, the step-in variety). Remember, as formations build, they increase their sink. I use a long front riser cross connector and step into it, using my legs to increase my sink and my brakes to cancel out penetration. With this method, it is possible to sink or float your canopy relative to the formation. Other techniques can be used but these may introduce a seesaw motion to the video and negate any heading reference to be used later.
You'll find at least 10 or more different kinds of formations and many variations of them all. In order to chase them, remember as the formation increases in size it will produce more drag, causing it to descend faster. The front riser alone will increase your forward drive out performing the formation. You will have to slow down and increase your sink little by little as it builds to keep relative. Vertical formations like stacks will seem like they are falling out of the sky. Diamonds on the other hand don't sink quite so much and are easier to keep up with. Four way rotation and sequential dives are even easier. Just be aware that they barely sink at all. Also their canopy performance is not as impaired as in the large formations. Don't lose them at the exit; you'll have no height advantage in catching them if they should get away.
Turbulence & Canopy Wake: As the formation builds and the traffic below it increases, you may experience their canopy turbulence. Just take a position outside this area. If you find yourself directly behind the formation, it can be like a small car on the highway following a semi truck. Remember that the wake of a canopy is on the same plane as its glide slope. If you're in the formation's burble, you may be too high to keep a reference on the horizon. Nonetheless, I know several cameramen that do not use any front riser assist at all that fly the burble. I find that it imparts too much vibration and shake to the camerawork. This may be acceptable or not. Keep trying in order to find what works best for you.
Mid-air encounters: As cameraman it's important to keep a sharp eye out for other canopies in your area. I find myself addressing the team before most of our jumps, reminding them that they have no business flying back as far as the cameraman. I remind them, that if they're in my area, I can't see them, stating that "I'm focused on the formation". It's possible they may be too far back to close their slot in a timely fashion.
It's also important to discuss what can happen in a formation that wraps. You can see wraps before they happen. Often the formation doesn't look right. A grip is lost or an oscillation develops. In the case of a diamond, a wing may be flying too high and the formation may look mushy. It may be time to fly a little to the side to make room for the canopies that become spit out. I have had wraps go right under my feet, in a split second. So give them some room, one more body in all that mess won't help.
Now we get down to break-off altitude or the air gets too rough. If the formation has not yet been completed by this point, and the team has been waiting for these last few canopies to close, there may be some pressure building to break off. Most of the canopies at this time just want out. When the word from the top is given, you may have several canopies around you before you know it. Remember, the cameraman may be the last thing on anyone's mind at this point. Jumpers may actually hang around to watch the formation break down. Emphasize beforehand that as the formation breaks down, you'd prefer it if the jumpers fly left or right of the formation, not behind it.
Landings: Many CReW workers fly back to the drop zone (DZ) like a pack of wolves. The reason for this can be varied, but mainly just to reach the airport. Convince jumpers to stagger their altitudes. Even if they don't stagger altitudes, give yourself some landing room and put your canopy 200 ft. lower than the pack, or fly in 1/4 brakes and out float the pack. Landing in large groups can be tricky and hazardous.
Any Drop Zone (DZ) interested in hosting a Mike Lewis CReW seminar please E-Mail Mike.
![]()